Applying Cloth and Tape
The WEST SYSTEM range includes a number of reinforcing fabrics suitable for further strengthening and protecting the structure
Applying reinforcing fabrics to joints bonded with epoxy
The WEST SYSTEM® range includes a number of reinforcing fabrics suitable for further strengthening and protecting joints in your structure.
Glass cloth may be applied to surfaces by two methods to provide reinforcement and abrasion resistance. It is usually applied after the fairing and shaping process have been completed and before the final coating operation. These fabrics can also be applied in multiple layers, or ‘laminated’, and be used in combination with other materials to build composite parts.
There are two types of technique that can be used to apply cloth and tape: the ‘wet’ method and the ‘dry’ method. The wet method involves the cloth being applied to an epoxy-coated surface before the coating reaches final cure. The dry method involves applying the cloth over a dry surface and then impregnating the glass with epoxy. The wet method is preferred whenever possible.
This page covers:
The wet method for applying cloth and tape
The dry method for applying cloth and tape
Alternative wet-out method for clear wood finishes
The wet method for applying cloth and tape
By working with small quantities of epoxy, it is possible to work at a comfortable pace to reinforce quite large areas with the wet method.
1. Prepare the surface for bonding
2. Pre-fit and trim the cloth to size
Roll the cloth neatly so that it may be conveniently rolled back into position later.
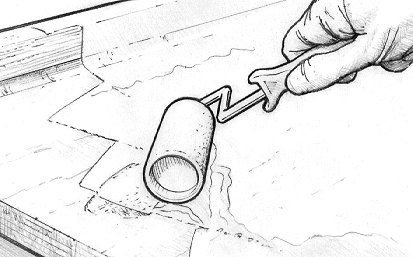
3. Roll a heavy coat of epoxy onto the surface
4. Unroll the glass cloth into position over the wet epoxy
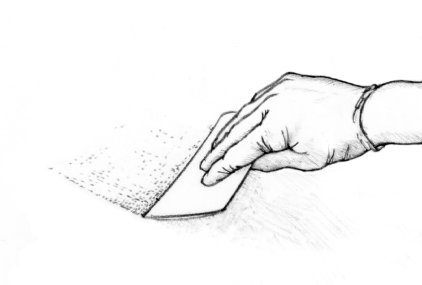
Surface tension will hold most cloths in position. If you are applying the cloth vertically or overhead, it is possible to wait until the epoxy becomes a little tacky before doing this. Work out any wrinkles by lifting the edge of the cloth and smoothing from the centre with a gloved hand, a squeegee or a spreader. If you need to cut a pleat or notch in the cloth, lay it flat on a curve or corner, make the cut with sharp scissors and temporarily overlap the edges.
5. Apply additional epoxy to dry-looking areas
Apply more epoxy with a foam roller to any areas of cloth which appear to be dry. Dry-looking areas of cloth will be white in appearance.
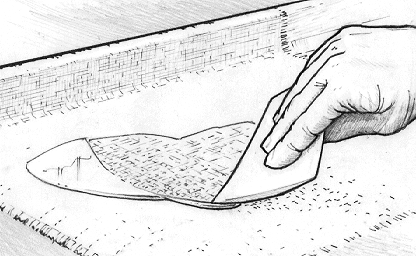
6. Remove the excess epoxy
Use a squeegee, using long overlapping strokes of uniform pressure, to remove the excess epoxy. It’s important to remove the excess epoxy because otherwise the cloth may ‘float off’ the surface, but avoid creating dry spots by exerting too much pressure on the squeegee. You can recognise excess epoxy because it appears as a shiny area. A properly wet-out surface appears evenly transparent with a smooth cloth texture. Subsequent coats of epoxy will fill the weave of the cloth.
Squeegee away excess epoxy before it begins to gel.
7. Apply any further cloth layers
Further layers of cloth may be applied immediately by repeating the steps above.
8. Trim the excess and overlapped cloth
Do this after the epoxy has reached its initial cure. You’ll find that it’s easy to cut with a sharp utility knife as long as the epoxy is not fully cured. If required, trim overlapped cloth as follows.

Trim excess cloth after the epoxy gels but before it cures hard.
Coat the surface to fill the weave before the wet-out becomes tack free.
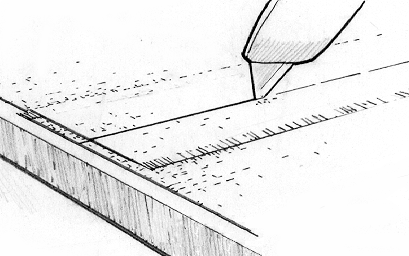
a) Place a metal straightedge on top of and midway between the two overlapped edges.
b) Cut through both layers of cloth with a sharp utility knife, being very careful not to cut too deeply.
Trim overlapped cloth after the epoxy gels
c) Remove the top-most trimming and then lift the opposite cut edge to remove the overlapped trimming.
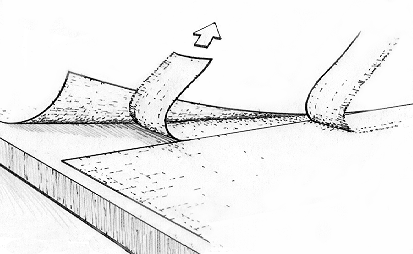
Remove the top-most trimming, lift the opposite cut edge to remove the overlapped trimming.
d) Re-wet the underside of the raised edge with epoxy and smooth into place.
The result should be a near perfect butt joint, eliminating double cloth thickness. However, a lapped joint is stronger than a butt joint, so if appearance is not important, it may be advisable to leave the overlap and fair in the unevenness after coating. Alternatively use a tapered edge cloth to eliminate the need to butt join.
Any remaining irregularities or transitions between cloth and substrate can be faired by using an epoxy/filler fairing compound if the surface is to be painted. Any fairing completed after the final glass cloth layer should receive several additional coats of epoxy over the faired area.
9. Follow the procedures for final coating in the next section.
It will take two or three coats to completely fill the weave of the cloth and to allow for a final sanding that will not damage the cloth.
Coat the surface to fill the weave before the wet-out reaches its final cure stage
The dry method for applying cloth and tape
1. Prepare the surface for bonding
2. Position the cloth over the surface and cut it 30 mm larger on all sides
If the surface area to be covered is larger than the cloth size, allow multiple pieces to overlap by approximately 50 mm. On sloped or vertical surfaces, hold the cloth in place with masking or duct tape, or with staples.
3. Mix a small quantity of epoxy
Use around three or four pumps each of resin and hardener.
4. Apply resin/hardener mix to the working surface
On horizontal surfaces, pour a small pool of resin/hardener near the centre of the cloth, but it is essential to use a roller or brush for wetting cloth on vertical surfaces.
5. Spread the epoxy over the cloth surface
Spread epoxy with an 808 Plastic Squeegee, working the epoxy gently from the pool into the dry areas. As the fabric is wet out it becomes transparent, indicating the cloth has absorbed sufficient epoxy. If applying cloth over a porous surface, ensure that sufficient epoxy is left to absorb into both the cloth and the surface below. Try to limit the amount of squeegeeing as excessive ‘work’ on the wet surface produces minute air bubbles which are placed in suspension in the epoxy. This is especially important if a clear finish is required.
Spread the epoxy over the cloth surface with a plastic spreader.
6. Continue pouring and spreading or rolling small batches of epoxy
Spread this epoxy from the centre towards the edges, smoothing wrinkles and positioning the cloth. Check for dry areas (especially over porous surfaces) and re-wet as necessary before proceeding to the next step. If cutting a pleat or notch in the cloth, lay it flat on a compound curve or corner, make the cut with a pair of sharp scissors and temporarily overlap the edges.
7. Complete the cloth application process
Now refer to steps 5 to 9 detailed above in the ‘wet method’ to complete the procedure.
Alternative wet-out method for clear wood finishes
An alternative wet-out method is to lay the epoxy onto the fabric with a short bristled brush. Dip the brush in the epoxy and lay the epoxy onto the surface with a light even stroke.
Do not force the epoxy into the cloth. This may trap air in the fabric and show through the clear finish. Apply enough epoxy to saturate the fabric and the wood below.
After several minutes, lay on additional epoxy to dry (white) areas. If epoxy appears milky due to high humidity or overworking, warm the surface by passing a heat gun or hair dryer over it. Use low heat to avoid out-gassing. Be sure to use 207 Special Clear Hardener™ for clear finishes.